Kick drum synthesis is the process of generating a bass drum sound from oscillators, envelopes and other signal processing rather than beginning with a finished recording. A simple kick can come from a sine wave whose pitch drops quickly while its level fades. A convincing production sound also depends on timing, harmonic balance and the space left for the bassline.
That simplicity is useful. If a kick is muddy, you can shorten the tail instead of searching through another sample folder. If it lacks definition, you can change the first few milliseconds without replacing the entire sound. Synthesis does not automatically beat samples; it gives you a different set of controls over the result.
This guide explains the process, offers reproducible starting exercises, and compares documented tool approaches. It does not include fabricated listening tests, measured performance claims or demonstration audio. Product pages were checked on 2 November 2026, and settings below are educational suggestions rather than developer presets or universal rules.
The three parts of a kick
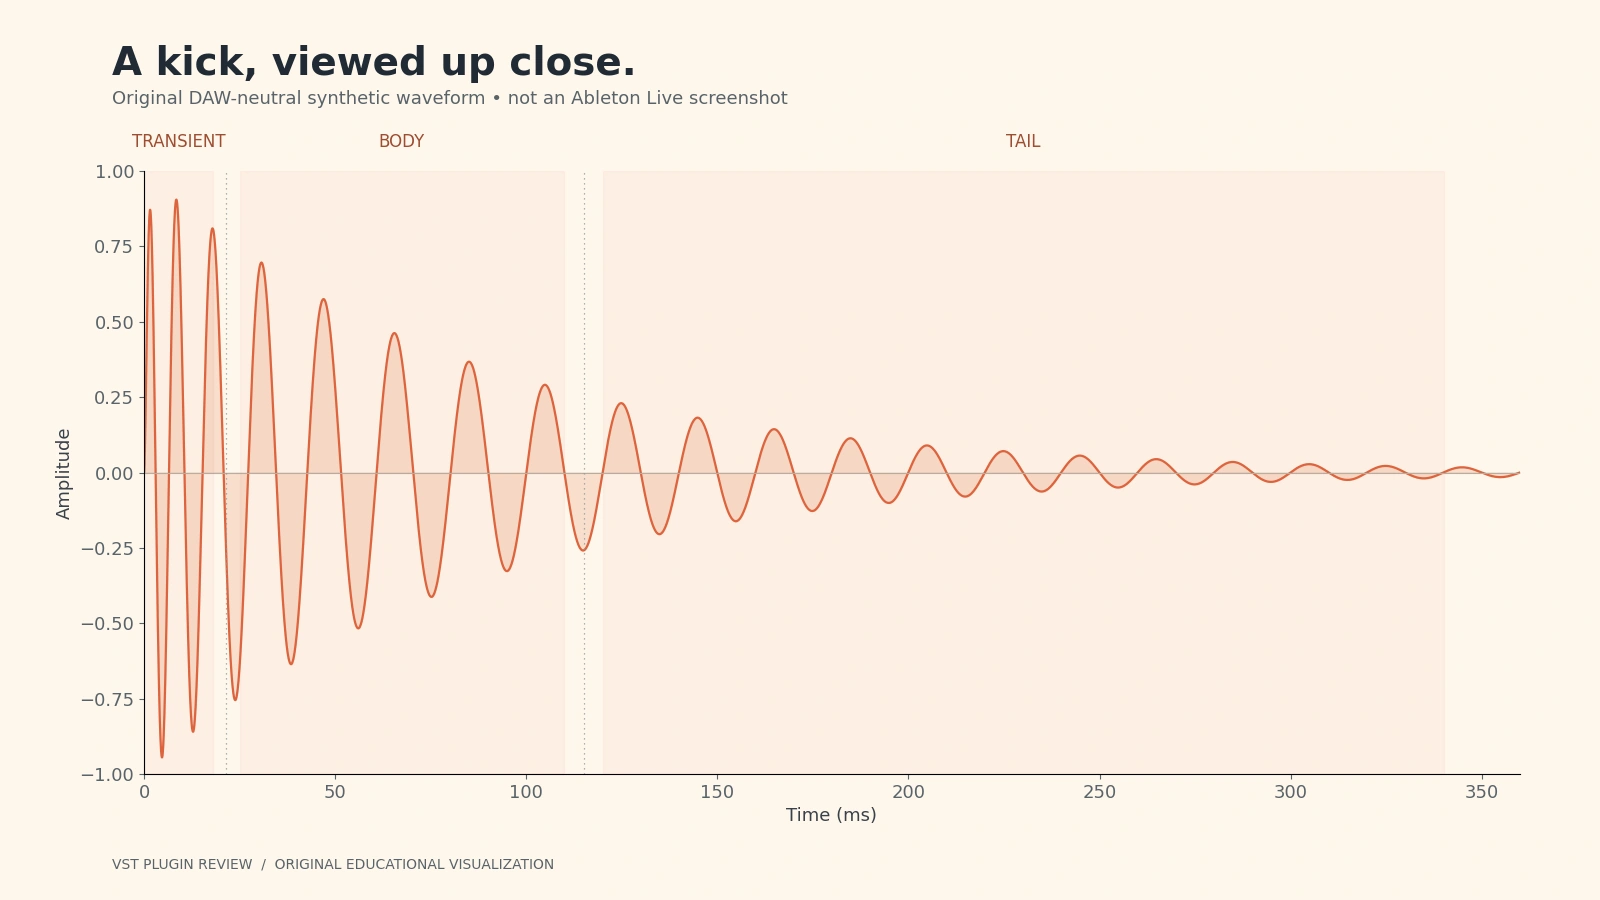
A useful listening model separates transient, body and tail. The transient is the opening event that establishes timing. The body carries most of the low-frequency weight. The tail determines how long the sound occupies the arrangement. These overlap; they are not necessarily separate layers in the synthesizer.
The apparent impact of a kick comes from their relationship. A loud click on a weak body can feel thin. A huge tail with a soft front can feel slow. A short kick may sound unimpressive alone yet provide excellent definition under a busy bassline. Judge the instrument in the arrangement before deciding it needs more processing.
Acoustic drums involve membranes, resonances and microphone capture. Electronic kicks do not need to reproduce all that complexity to perform the same rhythmic role. A controlled pitch descent, a clear amplitude shape and selected harmonics can establish an effective bass drum without an acoustic model.
Fundamental frequency and pitch decay
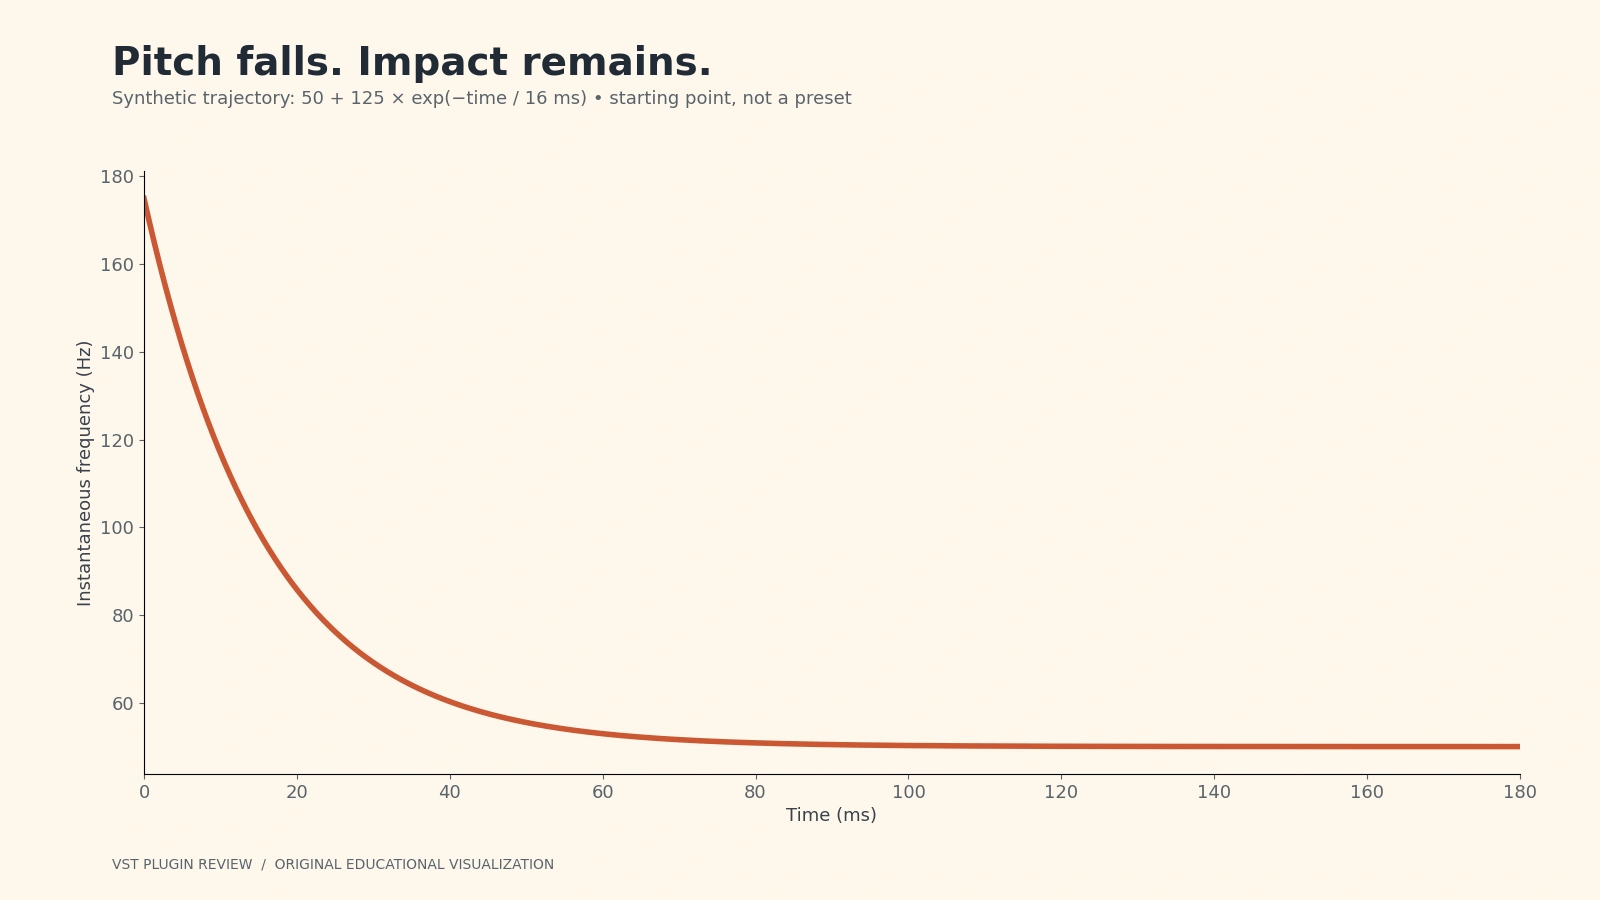
A steady sine has one frequency. A synthesized kick usually moves from a higher initial frequency toward a lower settling region. That downward trajectory creates the characteristic transition from attack to bass body. It is more informative to ask where the pitch settles, and for how long, than to assign the entire kick a single note.
As a learning exercise, use a body around 50–60 Hz and an initial frequency around 150–200 Hz. Let the sweep finish over several tens of milliseconds, then adjust by ear. These values are only starting points. A different genre, playback system or bass pattern may call for a different register and shape.
Pitch curves matter. A straight line measured in hertz is different from a straight line measured in semitones. A curve that changes quickly near the beginning and settles smoothly can create a different attack from one that stays high then drops abruptly. Move one intermediate point at a time if your synthesizer provides breakpoint editing.
Amplitude is an independent design problem
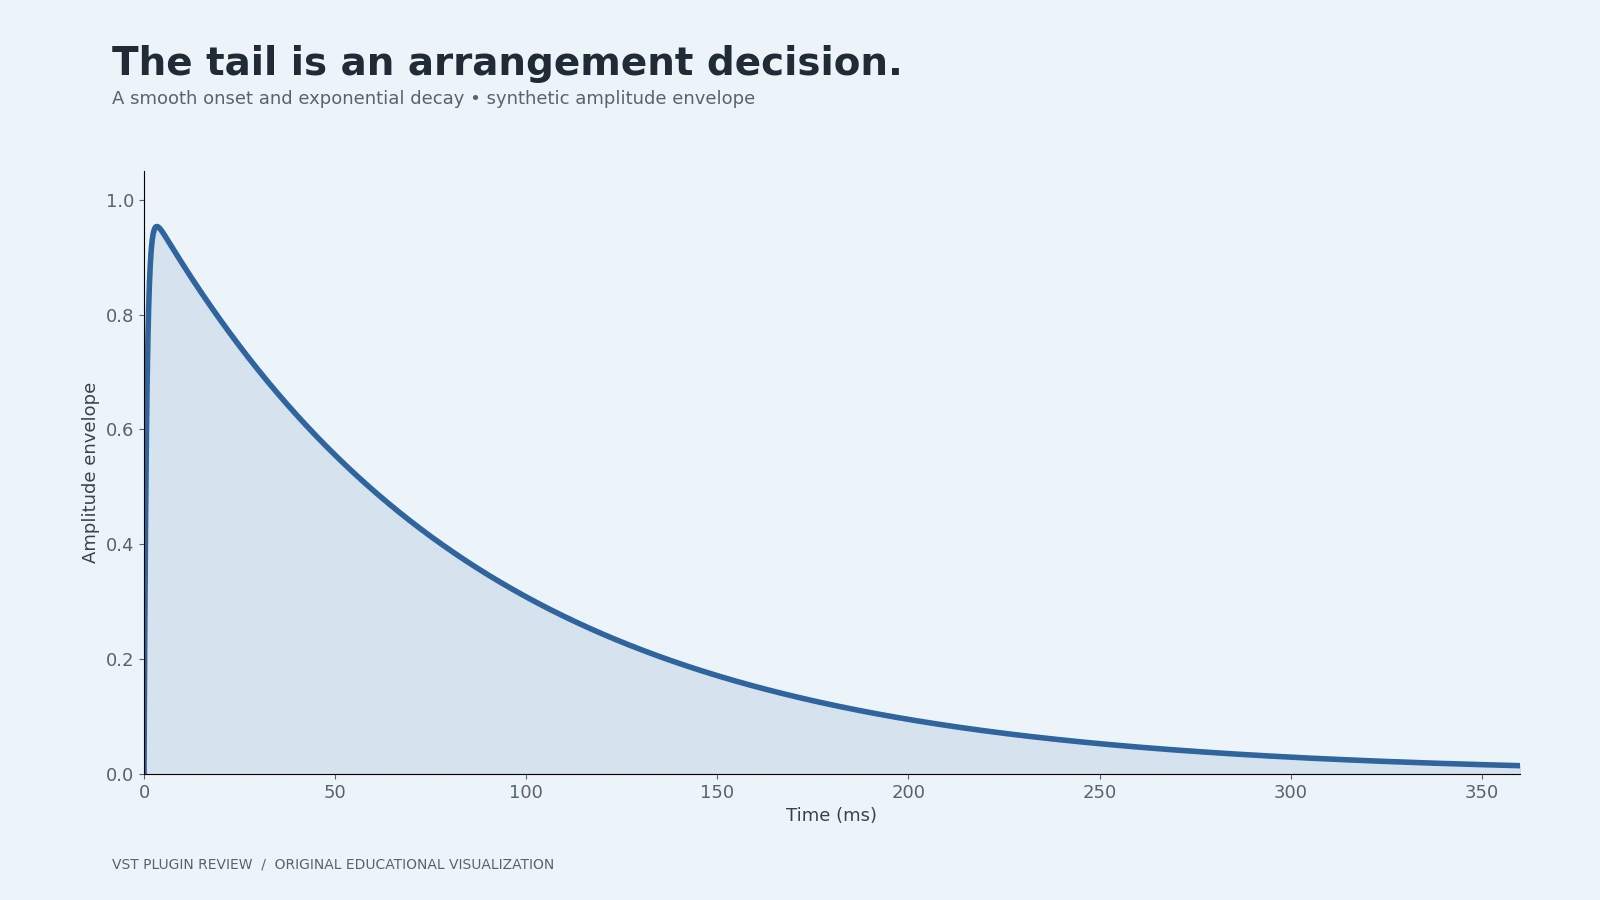
The pitch envelope tells the oscillator which frequency to produce. The amplitude envelope tells it how loud to be over time. They interact perceptually, but solving one does not replace the other. A good sweep can still sound weak if the amplitude falls before the body develops.
Begin with a very fast attack, no sustained plateau, and a decay that becomes silent before the next important bass event. Smooth the final transition to zero. Abruptly cutting a waveform at a nonzero point creates a discontinuity, which can be audible as a click unrelated to your designed transient.
Do not blindly remove every visible discontinuity. An intentionally sharp opening contributes attack, and phase resetting can affect how that opening behaves. Listen at modest volume while adjusting the start and end separately. A fade that fixes the tail can damage timing if applied to the front unnecessarily.
Step by step: synthesize a kick from a sine
1. Establish the musical context
Create a short loop with a kick rhythm and a simple bassline. Choose the track tempo before designing duration. Begin with generous headroom and bypass bus limiting so loudness processing does not hide your envelope decisions. Keep one consistent reference level while comparing versions.
2. Start with the simplest voice
Use one sine oscillator with a pitch envelope and an amplitude envelope. Disable unison, random tuning, long release and effects. If oscillator phase can reset, start with a repeatable setting. Repetition helps you hear the consequence of a parameter change rather than a different starting cycle on every note.
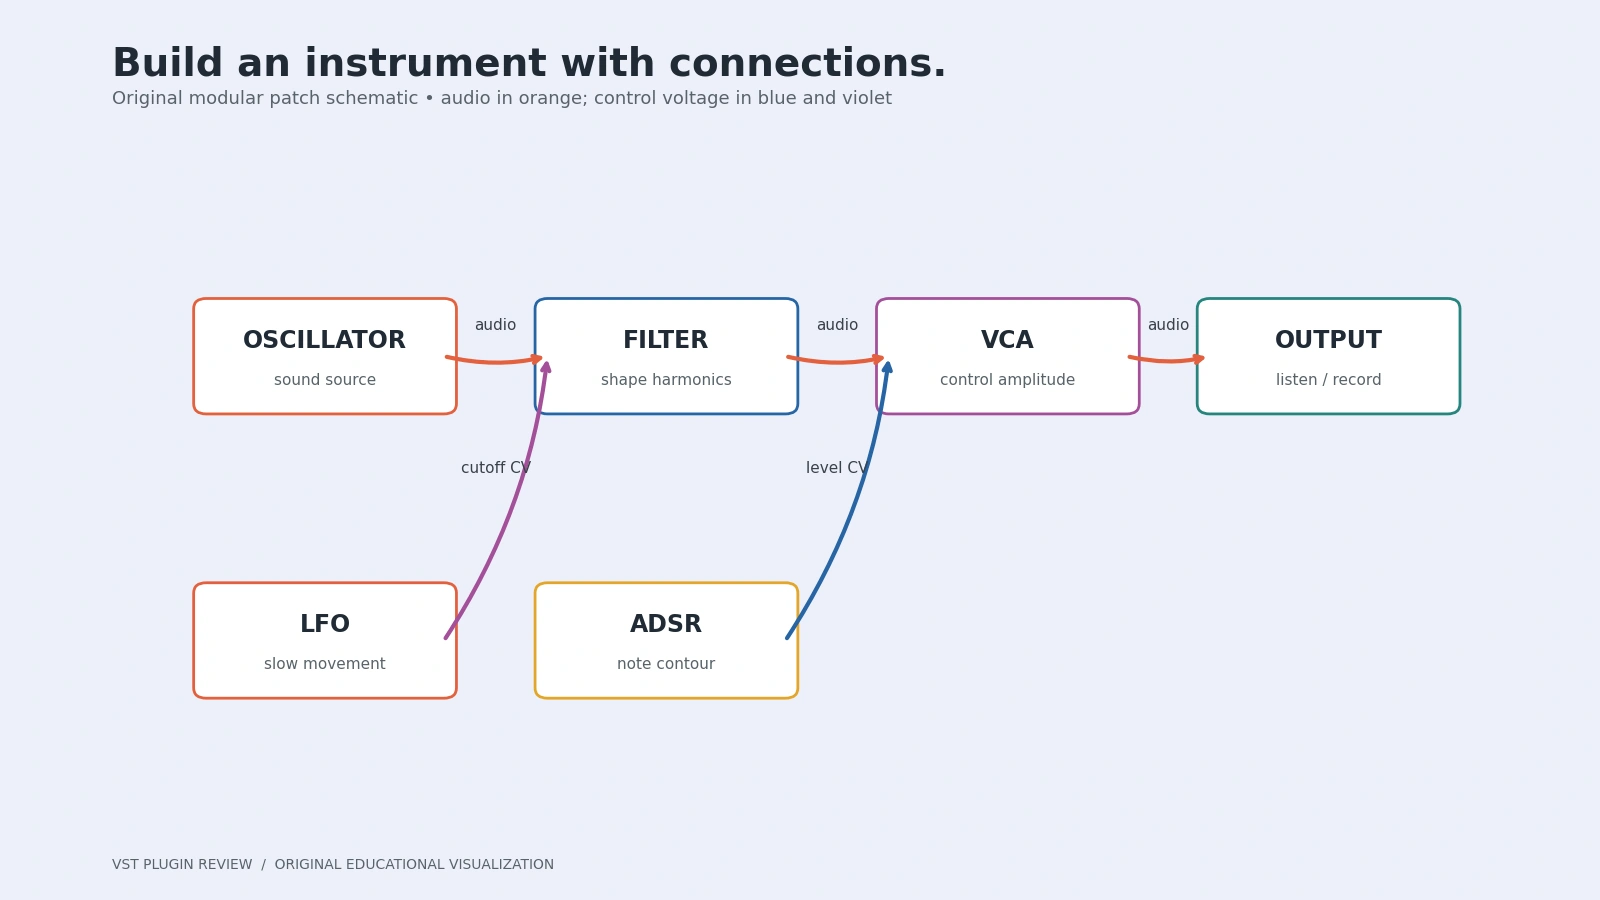
A synthesizer without a dedicated kick module can still work if its pitch modulation range and timing are suitable. Our modular synthesis guide explains how oscillators, envelopes and VCAs fit together. You do not need a specialized purchase to understand this exercise.
3. Shape the pitch drop
Set a low body pitch, then add a higher starting point and a quick downward movement. Begin with an obvious sweep so you understand the control. Shorten or reduce it until it reads as impact instead of a cartoon laser. Save a version before making the next change.
If the attack chirps, try reducing the pitch interval, shortening the high section or changing the curve. If it feels dull, experiment with slightly more initial movement before adding a separate click. Increasing the initial frequency indefinitely can consume headroom without producing the desired low-frequency punch.
4. Shape the loudness contour
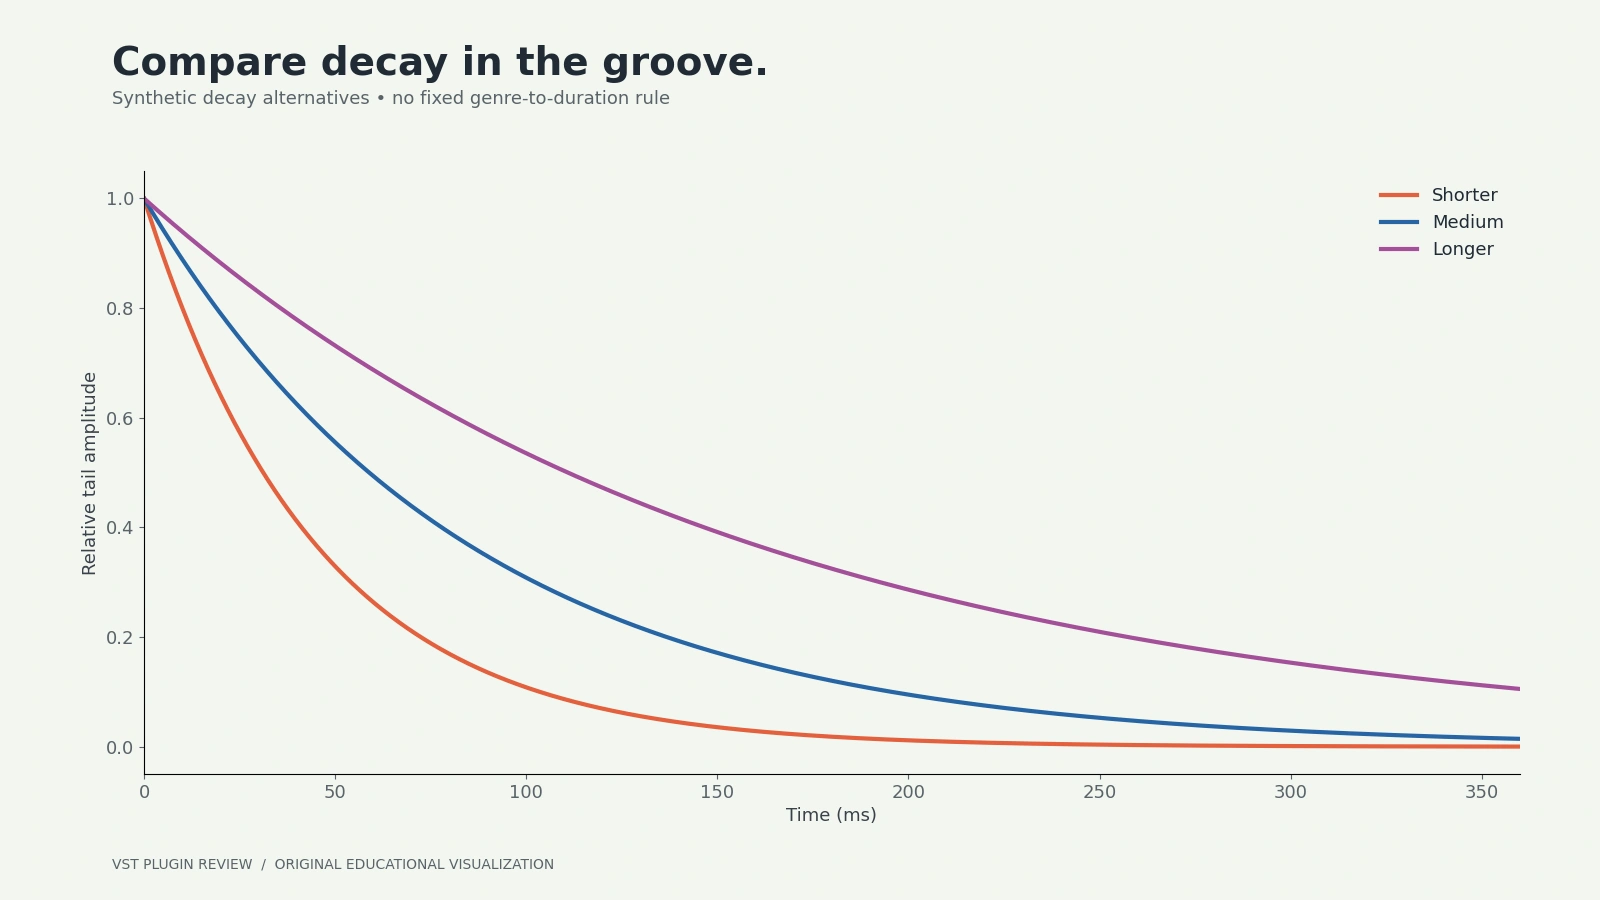
Reduce the amplitude tail until the kick leaves room for the first bass event, then lengthen it just enough to support the groove. Listen to the tail at the actual track tempo. A 250 ms sound is not inherently tight or loose; its meaning depends on the placement of everything around it.
A useful experiment is to save three versions with short, medium and longer decays while holding peak output roughly consistent. Compare them inside the loop. If one seems better only because it is louder overall, lower its level and compare again before deciding the envelope is superior.
5. Add a deliberate transient
Only add a click layer if the synthesized opening does not establish timing adequately. Try a very short noise burst, a filtered sample you have permission to use, or another brief oscillator component. High-pass unnecessary low end from that layer to reduce overlap with the sine body.
Move the layer in tiny increments and listen to the combined attack. A visually aligned sample start does not guarantee a pleasing combination, especially when the layers contain different low-frequency content. Keep the click quiet enough that it supports the kick rather than sounding like a second percussion instrument.
6. Add harmonics and match the output
A pure sine can be difficult to hear on playback systems that do not reproduce its fundamental strongly. Gentle saturation introduces harmonics above it. Increase drive gradually, then compensate output gain. Compare at a similar perceived level; otherwise the louder processed version will often seem more exciting regardless of quality.
Stop when the new harmonics serve the arrangement. The aim might be audibility on small speakers, a rough techno texture or a more distinct attack. Those are different goals. A single aggressive distortion setting should not become the default answer to every weak kick.
7. Test the kick with bass and render a version
Listen in mono, at low level and with the rest of the track. Temporarily mute the click to check whether the body still works. Temporarily shorten the tail to determine whether sustained overlap is causing muddiness. Export a clearly named version once the main decisions hold up.
If rendering MIDI instruments, record several repeated hits and inspect consistency. Random phase, voice stealing, overlapping release or velocity modulation can change the result. Consistency is a design choice rather than an absolute requirement, but accidental variation makes mix decisions harder to reproduce.
Transient, saturation, distortion and clipping
Saturation and clipping alter waveform shape and can generate additional harmonics. A softer transfer curve and an abrupt ceiling can behave differently, but labels alone do not establish sound quality or transparency. Input level, oversampling behavior and the actual processor design matter.
Clipping can reduce peaks, yet driving a long low-frequency waveform heavily may create an abrasive sustained tone. It can also change the balance between transient and tail. If the kick becomes louder but loses timing definition, reduce drive and revisit the original envelope instead of adding more gain stages.
Distortion before an amplitude envelope is not always equivalent to distortion afterward. In one arrangement, the envelope shapes the distorted signal; in another, changing level feeds the distortion differently over time. Try both when your setup allows it, keep the output matched, and save the version that serves the mix.
Phase alignment and kick–bass separation
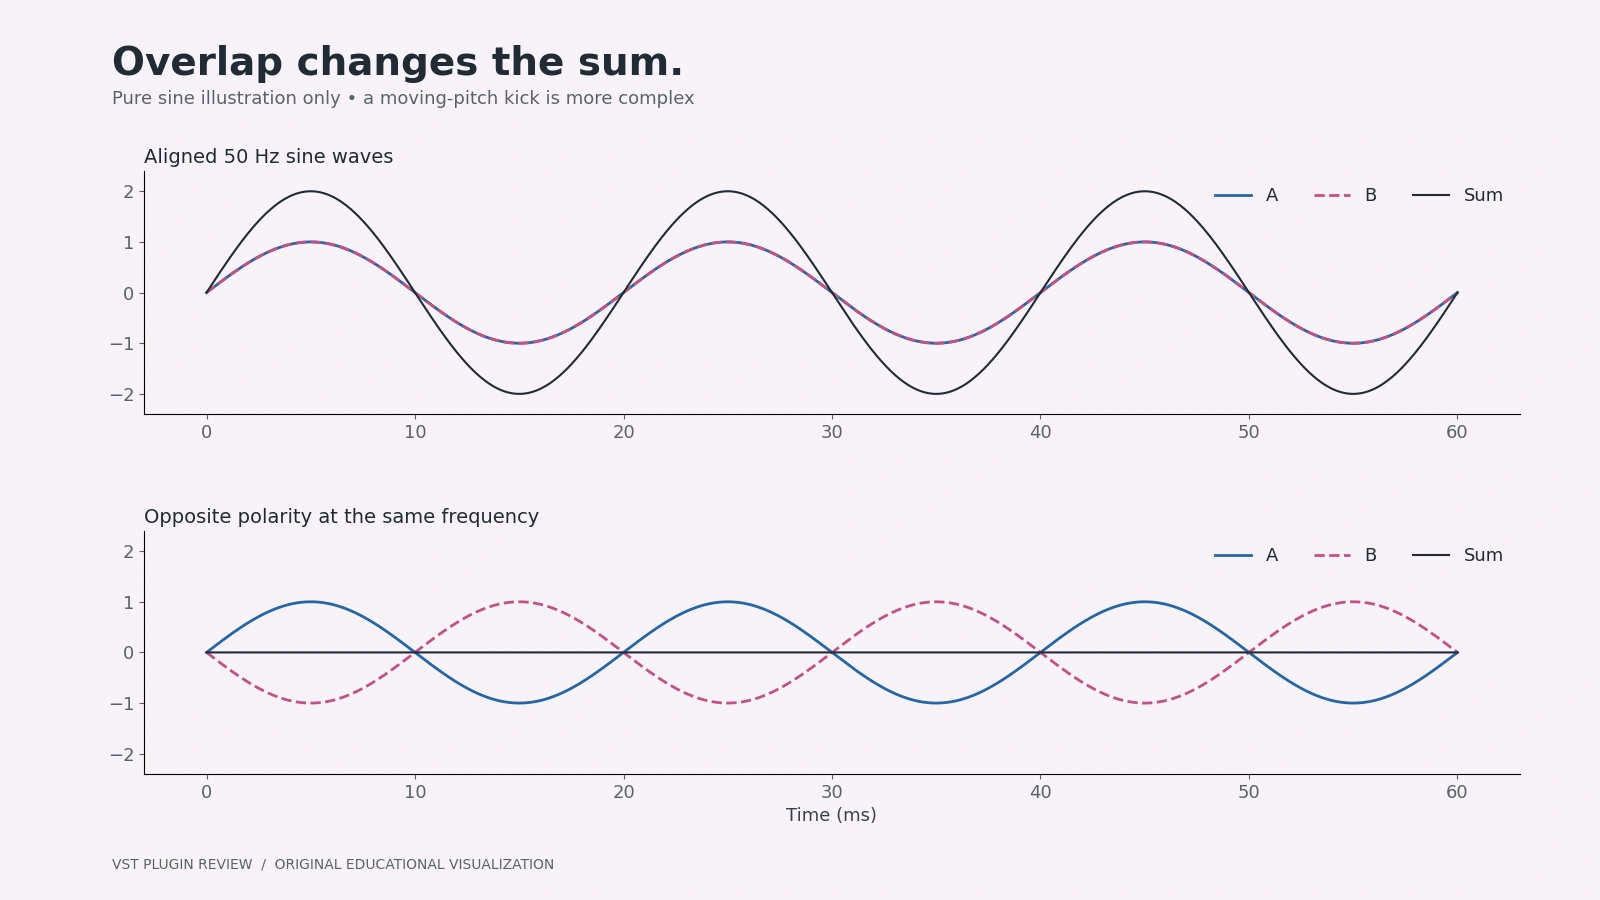
Polarity inversion flips positive and negative samples. A time offset moves the signal. Neither operation guarantees alignment across a kick's changing frequency and a bassline's changing notes. There is no universal sample offset that makes every low end work.
Start with musical timing and envelopes. Shorten competing tails, delay an early bass onset where the groove allows it, or choose complementary registers. Then try polarity or small timing changes as controlled comparisons. Recheck several notes and hits, because a setting that reinforces one moment can weaken another.
Avoid selecting an offset from waveform appearance alone. An oscilloscope can reveal timing and consistency, but the sum is what matters. Monitor in context at a stable level and preserve your original version. If a bass patch changes substantially, reassess the relationship instead of assuming the old adjustment remains correct.
Techno kick exercise: weight without endless sub
Build the clean sine kick first. Try a slightly longer body than the shortest version in the earlier exercise, then add restrained saturation for a more textured midrange. Keep the initial hit distinct. A long distorted tail does not need to dominate the entire beat to establish a forceful techno rhythm.
For a rumble-style layer, send a copy into a separate effects path, filter and shape that return, and leave the dry transient intelligible. Treat the rumble as another arrangement element with its own envelope and headroom. The effects tail should not be mistaken for an unavoidable part of the original synthesized kick.
Check the low end when the bass and other drums enter. If the arrangement becomes indistinct, shorten or filter the return before making the kick louder. Genre references provide useful context, but they do not justify copying one numeric decay or distortion setting across every tempo and mix.
House kick exercise: a clear, rounded groove
Use a moderate pitch movement and a body that supports the bass pattern without dominating it. Start with a softer click than an aggressive festival-style transient. Adjust the relationship between the first peak and the later body until the kick feels present at a sensible channel level.
House basslines often carry rhythmic and harmonic movement. Let that movement influence the kick duration: a sustained bass note may call for a tighter kick, while a sparse arrangement can leave room for more body. Test the groove with percussion instead of designing an isolated kick indefinitely.
A little saturation can provide useful audibility, but compare it with the clean version at matched level. If the saturated kick masks vocals or claps, reduce the generated upper content rather than assuming a louder, brighter kick is always a more professional one.
Psytrance kick exercise: repeatable pitch and clean handoff
Build a consistent sweep with a clearly defined settling region, then focus on where the first bass note begins. A rolling bass pattern makes tiny overlaps perceptually important. Test several repetitions and different bass notes before committing to phase or timing adjustments.
Use the amplitude tail to create a controlled handoff rather than relying entirely on sidechain compression. Sidechaining can be useful, but an unnecessarily long kick tail still consumes headroom. Reduce it until the groove becomes clear, then restore only the length that adds useful weight.
The click should establish timing without becoming a separate sharp distraction. Compare the full kick, body only and click only at low volume. If the body is doing little while the click carries all the apparent attack, revisit pitch and amplitude together before adding another layer.
Kick synthesizers: documented approaches, not rankings
1. Suckerpunch — New & Noteworthy
Suckerpunch is developed by Azazel Audio. I am affiliated with this product, so this section is affiliated coverage rather than an independent review. It is listed first because this tutorial includes a product with which the author is affiliated, not because of an independent test or ranking.
The official Suckerpunch page describes sine-based pitch shaping, sampler layers, mixer/dynamics processing and distortion selection. That documented parametric approach is relevant when you want to reshape the body and blend attack material within one workflow. The browser playground is explicitly a simplified synth, not the native plugin engine.
Availability needs confirmation: the checked page still displays coming-soon/get-notified messaging alongside a November 1, 2026 release statement. That date alone does not prove a purchase-ready release. We therefore do not state a confirmed price, downloadable native version, supported format list or purchasable status.
The public material checked does not sufficiently document a sample-analysis/resynthesis workflow or identify individual distortion engines. Those requested specifics remain unverified and are not presented as established features here. Sampler layering and analyzing a sample into synthesis parameters are different capabilities. Obtain the current native manual and release requirements before making a buying decision.
2. BazzISM — Established Kick Synthesis Alternative
The official BazzISM page lists version 2.5.5, Windows and macOS installers, VST2, VST3, AU and native AAX, including Apple Silicon support. It displayed a €30 license and registration terms for up to three computers when checked. Confirm the current checkout and your exact host before buying.
Its compact pitch-sweep kick approach is relevant if the primary task is designing a bass drum rather than assembling a large layered instrument. Begin with start/end pitch, sweep duration and decay in the installed documentation, then shape the output with your existing processing. Simpler parameter access can be a strength when you want a focused design process, while elaborate sample manipulation may require other tools.
The developer specifically warns that the demo introduces loud noise and is intended for compatibility checking and registration, not unrestricted evaluation. Lower monitoring level before opening it. Do not assume that a successful plugin scan establishes every part of a production workflow; save and reopen a test project in the intended host.
3. Sonic Academy KICK 3 — sample analysis as a documented option
Sonic Academy's KICK 3 page explicitly documents importing and analyzing kick samples, resynthesizing the sub element and separating click material. This makes it a relevant alternative when examining an existing, lawfully obtained sample is central to the workflow. The checked page displayed £79.95; pricing and checkout terms can change.
Analysis is a starting point rather than proof of a perfect reconstruction or permission to redistribute someone else's sound library. Compare the recreated result in your arrangement, confirm license rights for source material, and check the current technical specifications and demo terms. No fidelity or CPU claims are inferred from the developer's promotional language.
| Tool | Documented emphasis | Availability checked | Main decision |
|---|---|---|---|
| Suckerpunch | Sine/pitch shaping, sampler layers, mixer and distortion workflow | Launch messaging remains ambiguous | Obtain release/manual details before purchase assumptions |
| BazzISM | Focused synthesized kick workflow | Version 2.5.5; €30 displayed | Check host support and demo-noise warning |
| KICK 3 | Kick synthesis and sample import/analysis | Buy/demo links; £79.95 displayed | Consider when sample-derived editing matters |
| Existing synth | Oscillator plus suitable pitch/amplitude envelopes | Depends on your instrument | Learn the method before buying a dedicated tool |
Fix common problems in order
| Problem | Likely area to investigate | First controlled adjustment |
|---|---|---|
| Weak transient | Pitch curve or overly soft amplitude start | Change the initial sweep before adding a click |
| Muddy bass | Sustained overlap and competing registers | Shorten one tail in context |
| Unwanted end click | Abrupt amplitude cutoff | Add a short smooth fade to zero |
| Excessive sub-bass | Body pitch, duration and distortion balance | Raise or shorten the body before boosting highs |
| Hit-to-hit variation | Phase, modulation, velocity or overlapping voices | Render repeated hits with fixed settings |
| Loud but small kick | Peak processing changing the envelope | Bypass clipping at matched output level |
Frequently asked questions
Does every kick need to be tuned to the track key?
No. A moving kick may not have a stable pitched tail. If the body sustains a clear note, its relationship with bass harmony becomes more relevant. Tune with the arrangement and your listening goal rather than forcing every transient into a note-name rule.
Should I layer several kicks?
Only when each layer solves a defined problem. Two full low-frequency bodies can interfere and consume headroom. Start with one coherent body, then add a controlled transient or texture if needed. More layers do not automatically make more impact.
Do I need compression after synthesis?
Not necessarily. The amplitude envelope already determines much of the dynamics. Use compression for a specific remaining problem, and compare at matched level. Our compressor guide explains the controls and documentation-based tool choices without treating compression as compulsory.
Where are the audio examples and plugin screenshots?
No original comparison recordings or independently cleared screenshot assets were supplied for this article. The explanatory artwork is original and is not a plugin interface. Real demos can be added with recording provenance and gain-matching notes; invented audio or imaginary screenshots would make this tutorial less trustworthy.